Creating footwear tailored to your own taste has become an exciting way to showcase individuality and craft something truly special. Whether you're drawn to the idea of designing trainers that reflect your personality or you simply want to explore a new creative outlet, the process can be both rewarding and surprisingly accessible. With the right approach and a bit of patience, you can transform everyday materials into a pair of shoes that are entirely your own, all without needing a professional workshop or extensive experience.
Essential materials and tools for bespoke shoemaking
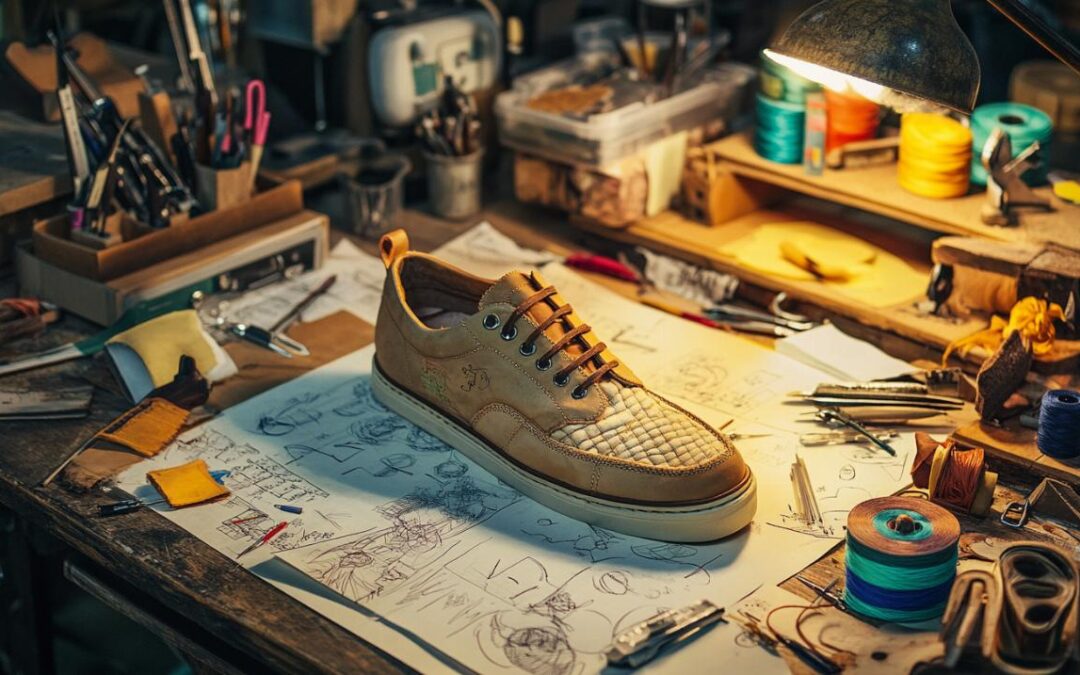
Embarking on a project to create your custom shoes at home begins with gathering the necessary materials and equipment. The foundation of any handmade shoe lies in the quality of the components you choose, and understanding what works best for your design will set the stage for success. From selecting the right base to assembling a toolkit that supports every stage of the process, careful preparation ensures that your finished footwear not only looks impressive but also stands up to everyday wear.
Selecting the right leather and fabric for your design
The choice of material is one of the most important decisions you will make when crafting bespoke footwear. Leather remains a popular option due to its durability and classic appeal, though it does require specific preparation and treatment. For those who prefer a more forgiving surface, canvas offers an excellent alternative, particularly for projects involving acrylic paints and detailed hand painting. When working with leather, it is essential to use a leather preparer to ensure that the surface is ready to accept dye and paint, while a high-quality sealant will protect the finished design from scuffs and moisture. If your vision includes bold colours or intricate patterns, consider fabrics that allow for easy application of fabric markers and dyes, ensuring that your creative ideas translate smoothly onto the shoe. The outer fabric should be complemented by a sturdy inner lining, which not only adds comfort but also reinforces the structure of the shoe. For the sole, materials such as cork or specialised shoe leather provide a solid base that can be shaped and layered to achieve the desired thickness and support. Investing in the right materials from the outset will save time and frustration later, as inferior components can compromise both the appearance and longevity of your handmade shoes.
Must-have equipment for crafting shoes at home
A well-equipped workspace is crucial for transforming raw materials into polished, professional-looking footwear. Start by assembling a range of tools that cover cutting, shaping, and assembly tasks. A retractable utility knife paired with a cutting mat will allow you to trim fabric and leather with precision, while a sharp pair of scissors is indispensable for more delicate work. An awl is essential for piercing holes in thicker materials, particularly when preparing the upper sections for stitching or attaching eyelets. Speaking of eyelets, an eyelet punch will enable you to create neat, reinforced openings for laces, and a set of pliers can help secure these components firmly in place. Fine brushes are necessary for applying paint and dye with control, and if you plan to work with leather, having acetone on hand for cleaning and preparing the surface is a must. Masking tape serves a dual purpose, protecting areas that you wish to keep free of paint and providing a guide for clean lines and geometric patterns. For assembly, a strong adhesive such as superglue or shoe glue will bond the upper to the sole securely, while thick thread and needles are required for hand-stitching the various fabric pieces together. A marker is useful for tracing patterns and making notes on your materials, and a roll of tape will come in handy during the construction of a foot cast, which serves as a custom last for shaping your shoe. With these tools at your disposal, you will be well-prepared to tackle each stage of the shoemaking process with confidence.
Crafting your unique footwear from start to finish

Once you have gathered your materials and tools, the next phase involves bringing your design to life through careful planning and meticulous execution. This stage is where your creative vision begins to take physical form, as you translate sketches and ideas into patterns and components that will eventually become a wearable piece of art. The process requires patience and attention to detail, but the satisfaction of seeing your bespoke footwear come together makes every step worthwhile.
Creating your pattern and preparing the components
The first task in the construction process is to develop a pattern that accurately reflects the shape and dimensions of your foot. This is where creating a foot cast, or last, becomes invaluable. To make a cast, you will need alginate and a casting material such as Permastone or rubber. Begin by mixing the alginate according to the instructions and immersing your foot in the mixture, held within a sturdy cardboard box. Once the alginate sets, carefully remove your foot and pour the casting material into the mould. After it has cured, you will have a three-dimensional replica of your foot that can be used to shape and fit the shoe precisely. With your cast in hand, you can begin drafting patterns for the upper sections of the shoe. Use paper to create templates for each piece, taking care to account for seam allowances and the natural curves of the foot. Trace these patterns onto your chosen outer fabric or leather, marking them clearly with a marker before cutting them out with scissors or a utility knife. The inner fabric should be cut in the same manner, as it will be sewn to the outer pieces to create a durable and comfortable upper. For the sole, measure and cut three layers of cork or leather to serve as the insole, midsole, and outsole. The insole should conform closely to the shape of your foot cast, while the midsole and outsole provide additional cushioning and traction. Preparing each component with precision at this stage will streamline the assembly process and ensure a better fit and finish.
Assembly techniques and finishing touches for professional results
With all components cut and prepared, the next step is to sew the upper sections together. Using thick thread and a sturdy needle, stitch the outer and inner fabrics along the edges, taking care to keep your seams straight and even. An awl can be used to pre-punch holes in thicker materials, making it easier to pass the needle through without damaging the fabric. Once the upper is assembled, attach eyelets at regular intervals along the top edge, using an eyelet punch and pliers to secure them firmly. These eyelets will hold the shoe laces and allow you to adjust the fit as needed. Next, turn your attention to the sole. Begin by shaping the insole to match the contours of your foot cast, then apply a strong adhesive to bond it to the midsole. If you wish to add extra height or support, a heel piece can be cut from additional cork or leather and glued into place at this stage. Once the layers of the sole are securely attached, use the adhesive to join the upper to the sole, pressing firmly and allowing sufficient drying time to ensure a strong bond. For added durability, consider hand-stitching around the edge where the upper meets the sole, reinforcing the join with closely spaced stitches. After the shoe is fully assembled, apply a protective sealant to any painted or dyed areas, brushing it on in thin, even coats and allowing each layer to dry completely before adding the next. This step is crucial for preserving your design and protecting it from moisture and abrasion. Finally, thread the laces through the eyelets and tie them securely. To create a matching pair, simply flip your paper patterns and repeat the entire process, adjusting as necessary to accommodate any slight differences between your feet. The result will be a pair of custom shoes that not only fit perfectly but also reflect your personal style and creative vision.